Tuesday, March 30, 2010

A Different Kind of Emotional Eating

The only thing better than a delicious meal is an easy one, which is why I adore papillotes, the French method of cooking fish and vegetables in little foil pouches. I found out about papillotes in one of the best books I’ve read in a long time: Lunch in Paris, by Elizabeth Bard. I discovered Elizabeth’s book in my “to-be-considered” pile at work, and immediately fell in love with it (I wonder why - Paris? Food? It’s a pretty easy sell). Elizabeth, a native New Yorker, went to Paris for a weekend visit, became enamored with a Frenchman and never returned. It’s every single girl’s fantasy come true. Of course, my fantasy is to move to Paris and spend all my free time at the markets sampling bread, cheese and chocolate. I don’t think it’s a lot to ask. After reading Lunch in Paris, I commissioned Elizabeth to write an essay for Harper’s Bazaar about emotional eating; the good, the bad and the ugly. Read it here. Elizabeth obtained a healthier relationship with food when she moved to France. As she writes in her essay, Food and Loathing, “[In France], I discovered a different kind of emotional eating, a happy strain resulting from tarts so gorgeous that they can genuinely make your day and meals lingered over with friends or lovers. I'd go so far as to say that in France, all eating is emotional. It's a celebration -- ritual, not fuel. The French don't worry about food. They enjoy it.” I want this blog to convey the same sense of pleasure Elizabeth feels when she eats in France. The French may have the upper hand when it comes to cooking, but that doesn’t mean the rest of us can’t derive the same joy out of creating a beautiful meal. And if it takes 15 minutes and doesn’t make a mess, well, what could be better than that? Like all French cooking, this recipe for baked fish is simple, elegant and delicious. It’s cooked in a foil pouch so it's a no-fuss-no-muss sort of dish (and those are the very best kind). The fish makes its own gorgeous sauce, which lightly seasons whatever vegetables you throw in with it. When you take the pouch out of the oven and cut a slit through its center, your kitchen will be filled with an incredible steamy aroma. While this meal will be on your plate in fifteen minutes, really try to savor it. Turn off the TV, light a candle and linger. How French.


Tilapia and Tomatoes Baked in Foil
Inspired by Truite en Papillotes from Lunch in Paris, by Elizabeth Bard.

As Elizabeth notes in her book, this recipe is just a starting point. I substituted her whole trout and cherry tomatoes with Tilapia filets, breadcrumbs and vine-ripened Roma tomatoes. You can truly use any type of fish, toppings and vegetables you like: from cod with miso and ginger to salmon with lemon juice, zucchini and Herbes de Provence (a mixture of dried herbs from the south of France. Buy them if you don’t have them. You will use them on everything).

Ingredients
2 Tilapia filets de-boned and rinsed
Coarse sea salt
Freshly ground pepper
Two ripe Roma tomatoes, one per filet
Drizzle of olive oil
Juice of one lemon
Sprinkle of breadcrumbs
Sprinkle of Herbes de Provence

Preheat oven to 400 degrees. Rinse the fish and lay each one on a separate piece of aluminum foil. You’ll need to seal the edges later, so leave a good four inches of foil on each end of the fish. Sprinkle sea salt, pepper and breadcrumbs over each filet. Cut tomatoes, and arrange them around the filets. Drizzle fish and tomatoes with olive oil and lemon juice, and sprinkle some Herbes de Provence over everything for good measure. Cover each fish with a second length of foil and carefully fold the edges together to form a neat little pouch. Transfer to a baking sheet and bake for fifteen minutes. Your papillotes will puff with steam.

Take out of the oven and carefully pierce each papillote with a knife to release the steam. Serve each Tilapia filet with a lemon wedge. Roasted asparagus and/or wild rice makes a nice side dish.

Serves 2.

Wednesday, March 24, 2010

Like Springtime in New York

Around this same time each year, something amazing happens in New York: suddenly, it’s Spring and the whole city becomes magical and alive again. This weekend was a span of two perfect days where the sun was shining, rooftop barbecues were in full swing and parks were crowded with families and couples just happy to be with one another. On Saturday afternoon, Dave and I went to our friend Peter’s apartment, where we ate grilled turkey, apple and brie sandwiches and drank Sweet Tea Vodka on the roof. It felt like summer, and the sheer simplicity of it all was really a beautiful thing. On Sunday, I headed to Cobble Hill park, Ted and Honey iced coffee and Sunday Styles in hand. If your faith in humanity is ever in need of restoring, visit the Cobble Hill Park on a warm Sunday afternoon. Between the children playing games, the dogs coming over to you for a pat on the head and the friends recapping the weekend over bagels and coffee, the joy coming out of that place is palpable.

Over the weekend, I also baked these scones – twice. Like warm weather and good friends, they’re one of life’s simple pleasures. I’m fascinated by how easy scones are to make and how good they turn out, regardless of what you add to them. I put my own spin on a classic scone recipe with buttermilk, orange zest and Craisins. I ate two of the first batch as soon as they came out of the oven Friday night, and have been devouring them consistently ever since. I guess that’s just the Irish and English in me. I’ve been eating scones at breakfast with scrambled eggs and for dessert with jam. I’m telling you, they’re curative, just like springtime in New York. Feel free to add whatever you’d like to yours. I plan to try walnuts and raisins next. Imagine the possibilities!


Buttermilk Scones with Orange Zest and Cranberries

Ingredients
1/2 c buttermilk
2 large eggs (or one extra large egg)
2 cups all-purpose flour
2 tsp baking powder
½ tsp salt
½ stick unsalted butter, cubed and chilled
3 Tbs sugar
1 Tbs orange zest
1 c dried cranberries or Craisins

Preheat oven to 425 degrees.

Beat together buttermilk and the egg(s) and set aside. Combine flour, baking powder, and salt in a large bowl. Rub the butter into the flour mixture, working until you have no lumps bigger than a pea. Add the sugar, orange zest and dried cranberries or Craisins and mix. Pour the buttermilk-egg mixture into the dry ingredients, leaving a bit behind to use as a glaze. Stir gently with a wooden spoon.

Turn dough out onto a lightly floured surface and knead 10 to 12 times, with floured hands. Pat dough into a round approximately ½-inch thick, and cut into 8 wedges. Place on an ungreased baking sheet. Using a pastry brush, glaze each wedge with remaining buttermilk-egg mixture.

Bake for 10-15 minutes, or until golden. Cool on a rack.

Friday, March 19, 2010

A Special Place in My Heart

Like I’ve mentioned before, Dave is from the South (St. George, South Carolina, to be precise). I feel as though I didn’t give the South the credit it’s due in my previous post. There are some things that Southerners have us Northerners completely beat on, and it’s not just fried food and college football, though they most definitely reign superior in those two departments. Other things that are better in the South include hospitality, weather, overall friendliness, and macaroni and cheese. I discovered this particular mac & cheese recipe in my Hominy Grill cookbook, and it’s my absolute favorite. The Hominy Grill is a Charleston institution that serves classic soul food like shrimp and grits, fried green tomatoes and chocolate pudding. It’s also where Dave took me on my first trip to Charleston, three Thanksgivings ago. It has a very special place in my heart, not just because of the so-good-it-hurts food, but also because I fell in love with Dave over brunch in their backyard seating area (another great thing about the South? It’s warm in November). Was it the biscuits and gravy or the salmon potato cakes that did me in? I may never know. Most likely, it was discovering Dave’s obsession with Tabasco sauce, which I find quite endearing.

Back to the point. I love this recipe because like all Southern food, it’s easy to prepare and downright delicious. There’s nothing fancy about the ingredients or cooking process, yet it’s one of those dishes that makes everyone happy. Who doesn’t love mac and cheese? I included more breadcrumbs and added a sprinkling of parmesan cheese to the macaroni for a really golden, bubbly surface. The Tabasco and Worcestershire sauce add just the right amount of kick and smokiness. But if you have a penchant for Tabasco, add as much as you like once the mac & cheese comes out of the oven.


Charleston Macaroni & Cheese
Adapted from the Hominy Grill Cookbook

Ingredients
1 16 oz package of elbow macaroni
2 c of the best quality cheddar you can find, grated
1/2 c parmesan, grated, plus more for later (buy a block and grate it yourself. Don’t get the kind you’d sprinkle on pasta)
2 c whole milk, scalded. You can do this in the same skillet you melt the butter in.
4 tablespoons all purpose flour
4 tablespoons unsalted butter
1/2 teaspoon salt
1/4 tablespoon Worcestershire sauce
1/4-1/2 tablespoon Tabasco sauce, depending on how much you’d like
Breadcrumbs (I like Progresso’s Italian style)

Preheat oven to 350 degrees. Grease a 9x13-inch Pyrex dish with butter. Sprinkle the bottom of the dish with breadcrumbs (about 4 tablespoons worth), and set aside.

Boil pasta until tender, and drain.

Melt butter in skillet over medium-high heat. Add flour and stir until there nothing left unincorporated.
Add scalded milk to skillet. Lower heat and simmer until thickened, whisking occasionally, about 10 minutes.

Add the cheeses, salt, Worcestershire and Tabasco sauces and stir until evenly blended.

Put the macaroni back in the pot you boiled it in, and add sauce. Stir with a wooden spoon until all the macaroni is covered.
Pour contents of pot into Pyrex dish. Cover the macaroni with more breadcrumbs (about two handfuls) and sprinkle parmesan cheese on top.

Bake for 30-40 minutes. Let cool about 15 minutes before digging in.


Note: This mac and cheese can be made a day or two ahead of time, covered with tinfoil, and kept refrigerated. It is also the very best thing to come home to after a bad day.

Wednesday, March 17, 2010

Let Them Eat (Carrot) Cake

I'm going through a bit of a cupcake phase. It happens to the best of us, I'm afraid. In New York, we have no shortage of incredible cupcake spots - Magnolia, Crumbs, Buttercup, Billy's...I could go on and on...but I won't, because making cupcakes from scratch is so much better than buying them. I'm beginning to think that statement applies to all homemade food. There's something about cupcakes that elicit fits of joy in otherwise calm people. I recently brought a batch of these Carrot Cake Cupcakes to the women in my mentoring group, Girls Write Now, and they literally shrieked with glee.

It's finally warm in New York, which reminds me that Easter is right around the corner (April 4, wheee!). Growing up, my Jewish father made ham for my Catholic mother every Easter Sunday. The details of my half-Jewish, half-Catholic and wholly religiously confused childhood are a story for another blog. Two things we always had at Easter were hyacinths and carrot cake. Now I don't know much about flowers, but I do know that these carrot cake cupcakes are the best I've ever had (thank you, Martha Stewart). And I've had a lot of carrot cake. They're not overly sweet or greasy, unlike the giant slabs of carrot cake you find at the bakery. There's so much deliciousness going on in these cupcakes - coconut, pineapple, walnuts - that they make me want to jump up and dance around. I wholeheartedly recommend making a batch, and sharing them with your mother.

Jewish friends, fear not: Passover Seder is March 29, and I will have lots of recipes from Aunt Lynn. Challah and bagels and brisket, oh my!

Carrot Cake Cupcakes
Adapted from Martha Stewart


Ingredients
4 cups peeled and finely grated carrots
3 large eggs, room temperature
2 cups sugar
1 1/2 cups vegetable oil
1/3 cup buttermilk
1 1/2 teaspoons pure vanilla extract
1/2 cup crushed pineapple, well drained
1 cup walnuts or pecans, toasted and finely chopped
1/2 cup sweetened shredded coconut
3 cups all-purpose flour
2 teaspoons baking powder
1 teaspoon baking soda
1 teaspoon salt
1 teaspoon ground cinnamon

Preheat oven to 325 degrees. Line 2 standard muffin tins with paper liners. I ran out of paper liners and greased the unlined pans with butter. Just be sure the tin is completely cooled - and I mean completely - before removing the cupcakes, or they'll fall apart.

In a bowl, whisk together carrots, eggs, sugar, oil, buttermilk, vanilla extract, and coconut, pineapple and nuts if desired. In another bowl, whisk together flour, baking powder, baking soda, salt and cinnamon. Stir flour mixture into carrot mixture until well combined.

Spoon batter into muffin cups, filling each 3/4 full. Bake until a toothpick inserted in center come out clean, about 28 minutes. Let cool in tins on wire racks for at least 10 minutes. Turn out cupcakes onto wire racks, and let cool completely.

Frost with Brown Sugar Cream Cheese Frosting

Makes about 28 cupcakes. I promise, you'll eat them all.

Tuesday, March 16, 2010

Just Can't Get Enough

Last night, Dave and I made dinner for our friends Peter, Sarah and Penny. In my mind, there’s nothing better than good food, good friends and some Aretha Franklin. Pinot Noir doesn’t hurt, either. And when people come all the way from Harlem to check out your new Brooklyn digs, you’ve got to reward them with a great meal. I plan to write a full post about last night’s festivities, but since I can’t stop eating this particular side dish I made last night, I thought I’d share it with you immediately. It was quite the crowd pleaser. I reheated it for lunch today and couldn’t get enough.

It’s funny how the things you despise in childhood often become the things you can’t live without as an adult (naps and the opposite sex come to mind). One of those things for me is mushrooms. I wouldn’t even look at them as a kid, but they are now my favorite vegetable. I love their substantial texture and how they are so easily substituted for traditional meat dishes. Have you ever had a Portobello mushroom burger? It’s life-changing. This dish may not be life-changing, but it certainly is heartwarming – and couldn’t be easier to prepare. I added kale to the mushrooms because, frankly, I had never eaten kale before and I was feeling adventurous. I found it added a nice touch of green to the mix. The red wine and butter made this taste like something you’d find in a Parisian bistro and made the whole thing taste so, so good.

I didn’t take any pictures last night because I was having too much fun, but I’ll upload some the next time I make this, which I anticipate will be very soon.

Sautéed Mushrooms and Kale in Red Wine and Butter

Ingredients
24 small mushrooms (whichever variety you prefer), sliced.
1 bunch of kale, washed and dried
3-4 cloves of garlic, minced
1/2 cup of red wine or sherry
4 tablespoons unsalted butter
2 tablespoons olive oil
Salt and pepper to taste

Put olive oil and butter in a large skillet over medium high heat. When butter is completely melted (but not brown), add garlic. Sautee for about 2 minutes. Add mushrooms and sauté for about five minutes, or until they are all heated through. Add half a cup of red wine, and lower heat. Simmer for another five minutes. Add kale and blend into the mushrooms with a spatula until wilted, about one minute. Serve immediately.

Note: The remaining sauce in the pan is wonderful over roast chicken.

Serves 4-8 people

Sunday, March 14, 2010

A Reason to Celebrate (and Bake!)


Last Thursday, my friend Meryl's co-workers threw her a going-away party. Starting tomorrow, she'll be working at Food Network Magazine (and hopefully accepting my recipe pitches). One of Meryl's favorite things are red velvet cupcakes. I love any reason to celebrate - and lately, any reason to bake - so I decided to make her a batch. Red velvet cupcakes - particularly the cream cheese frosting on top - also happen to be one of my favorite things. I was extremely excited Dave bought me an electric beater (ah, the things that make me happy these days), and even more excited he was there to help. Beating butter and sugar is no easy feat, people. Be sure your butter is as soft as possible, so that chunks of butter and sugar don't go flying all over your just-cleaned apartment. Hopefully that Kitchenmaid Mixer I've been pining for will magically be waiting outside my door when I come home from work one of these days. In any case, I was quite pleased with the way these cupcakes turned out - and I think everyone at the party was, too. They're a great accompaniment to beer, wine and reminiscing. Meryl told me these were some of the best red velvets she's ever had. Coming from her, that's a huge compliment.

Red Velvet Cupcakes
Adapted from Demolition Desserts

Ingredients
8 Tablespoons unsalted butter, at room temperature
1 cup plus 2 Tablespoons granulated sugar
2 large eggs, at room temperature
2 cups all-purpose flour
2 Tablespoons cocoa powder
2 teaspoons baking powder
1/4 teaspoon baking soda
1/2 teaspoon kosher salt
3/4 cup buttermilk
Scant 2 Tablespoons Red Food coloring

Preheat oven to 325. Whisk flour, cocoa, baking powder and baking soda, making sure to break up any lumps. Add the kosher salt after whisking and set aside. Combine the red food coloring with the buttermilk for easier incorporation.

Cream the butter and the sugar using an electric mixer, until the mixture is pale and fluffy (again, beware of flying chunks!). Add the eggs one at a time, letting the eggs beat for 1 minute in between additions. Scrape down the bowl in between additions.

Add the dry ingredients alternately with the wet ingredients. Start by adding one third of the flour mixture. Mix just to incorporate. Add half of the buttermilk. Add another one third of the flour mixture. Mix to incorporate. Add the last half of buttermilk, followed by the last third of flour.


Spoon into paper lined cupcake pans. Check the cupcakes after 20 minutes. I found they were perfect after 22 minutes.

Makes 12-14 cupcakes.


Brown Sugar Cream Cheese Frosting
Adapted from Joy the Baker

The cupcake recipe should be doubled for the amount of frosting this recipe produces. I had a ton leftover. Instead of attacking it with my spoon, I decided use the remaining frosting for Carrot Cake cupcakes.

1 1/2 cups butter, softened
8oz cream cheese, softened
1/4 cup packed light brown sugar
1 teaspoon vanilla extract
4 tablespoons milk
1-2 cups powdered sugar (use a rolling pin over the bag of sugar to eliminate lumps)

Cream the butter and cream cheese together in an electric mixer (Be sure that the two are at room temperature. Cold cream cheese or butter can make your frosting lumpy). Add the brown sugar and vanilla extract, and beat for about 2 minutes. Turn off mixer and add 2 cups of powdered sugar. Turn the mixer on a low speed so the sugar doesn’t fly out of the bowl. Slowly add more sugar alternately with the milk until you reach your desired consistency.

Sunday, March 7, 2010

An Epic Undertaking

Well, friends, my epic two-day-no-knead bread adventure was a success! I set out on my journey Friday night, after reading the first chapter of "The Art of Eating In," by Cathy Erway, and ended about two hours ago. Cathy's book landed on my desk last week, and I was compelled by the title (and awesome cover graphic of a grocery bag made entirely of food). Cathy's a Brooklyn girl like me, and she stopped eating out in New York for two years. I was intrigued - and admittedly a bit terrified - of her recipe for Peppercorn, Potato and Parmesan No-Knead Bread on page 42. The bread sounded delicious, but since I'm not the most patient person in the world, I wasn't sure I could handle watching a bowl of dough for two days. I recommend starting the dough on a Friday night and keeping yourself out of the kitchen 'til Sunday afternoon.

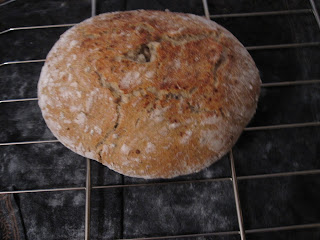
You might wonder why anyone would spend two days watching and nurturing bread dough. It's because this is the only way to achieve that glorious I just bought-this-from-a-bakery result. Well, I suppose you could just go to the bakery, but seriously, what fun would that be? There's a crisp, artisan-like quality to this bread that's both professional-looking yet extremely comforting.

The incredible, sometimes frustrating, thing about bread is that it requires so few ingredients (typically just some yeast, flour, water and salt) but demands so much during the baking process(perfect room temperature, time to rise, shaping and flouring, more time to rise). So you want to make sure that whatever you make is going to be worth it. I promise this recipe is. The boiled potato water adds depth to the dough, the peppercorns add a pleasant spiciness, and the Parmesan makes the crust golden and crispy (but I don't think I have to convince any of you of the power of bread and cheese).

Three things I had never done before making this bread:
1. Bought one and only one potato. Reader, be forewarned: you will undoubtedly get a strange look from the cashier.
2. Put peppercorns in a plastic bag and beat them with a rolling pin. It's surprisingly satisfying.
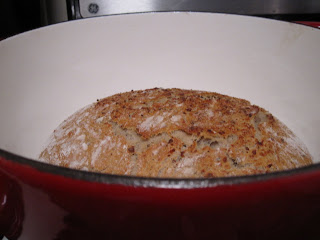
3. Put my dutch oven in the actual oven. This bread needs to bake in a 6 to 8 quart pot. I definitely thought the pot was going to break my oven rack. It didn't, and yours won't either.

Peppercorn, Potato & Parmesan No-Knead Bread
From "The Art of Eating In," by Cathy Erway


Ingredients:
3 cups all-purpose flour, plus more for dusting (Note: my dough was still SUPER sticky after 18 hours - to the point where I almost threw everything away and started over. I added another cup about three hours before baking. Don't be afraid if your mixture looks more like gray, peppery soup than dough. Simply add more flour and combine).
1/4 teaspoon active dry yeast
1 1/2 teaspoons salt
About 3 tablespoons black peppercorns, cracked (place them in a Ziploc bag and roll over them with a rolling pin several times)
1 5/8 cups water that was used to boil a potato, slightly cooled (this is a funny measurement. Anywhere between 1 1/2 and 1 2/3 is just fine)
Grated Parmesan

In a large bowl, combine flour, yeast, salt and pepper. Add water, and stir until blended; dough will be shaggy and sticky. Cover bowl with plastic wrap. Let dough rest at least 12 hours, preferably about 18, at warm room temperature (about 70 degrees).
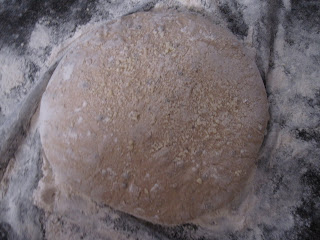
Dough is ready when the surface is dotted with bubbles. Lightly flour a work surface and place dough on it; sprinkle it with more flour and fold it over on itself once or twice. Cover loosely with plastic wrap and let rest about 15 minutes.
Using just enough flour to keep dough from sticking to work surface or your fingers, gently and quickly shape dough into a bowl, tucking folded parts underneath.
Sprinkle and gently pat the grated Parmesan across the top of the load. Generously coat a cotton towel (not terrycloth) with flour, semolina, or cornmeal, and place loaf seam-side down on it. Coat another cotton towel with flour, cover the dough and let rise for two more hours. When its ready, dough will be more than double in size and will not readily spring back when poked with your finger.


At least a half hour before dough is ready, preheat oven to 450 degrees. Put a 6-8 quart heavy covered pot (cast iron, enamel, Pyrex, or ceramic) in oven as it heats. When dough is ready, carefully remove pot from oven. Slide your hand under the towel and place dough Parmesan side up in the pot. Cover with lid and bake 20 minutes; then remove lid and bake another 15 minutes, until loaf is golden and gorgeous.


Cool on rack. Or, if you can't help yourself (like me), break off a piece immediately and enjoy - with butter, of course.

Tuesday, March 2, 2010

I Have a Weakness...

...and that weakness is pancakes. I love them. I think they should be eaten at all hours of the day, not just breakfast. In my mind, a plate of pancakes with melted butter and syrup is the perfect end to a night out. I guarantee the chocolate-chip variety topped with vanilla ice cream is the best dessert you'll ever have. And what can I say about blueberry pancakes? I don't think I've ever loved anything so much.

I'm still on a quest to find the perfect pancake recipe, so I anticipate many endeavors on this blog. I've been making this healthy vegan version for a couple years. While I'm the furthest thing from I a vegan, I love the subtle banana flavor in this recipe and the whole wheat flour makes me feel not so terrible about eating five...or six. I substitute half a banana for one egg (which works well in lots of baking recipes, by the way) and use soy milk instead of regular milk. You can use any kind of milk you like though. I've even made this recipe with half and half when we're out of milk. In any case, these are delicious and good for you - and, like all pancakes, delightful day and night.


I always put blueberries in these pancakes. When I'm craving something sweeter, I put chocolate chips in the batter. I recommend letting a bag of frozen blueberries thaw while you prepare the batter, then placing them in the pancakes after you've poured the batter into the skillet. Don't worry about them being frozen - they'll defrost in the pan. I find chocolate chip pancakes turn out best when the chips are directly mixed into the batter before the batter hits the skillet.


Whole Wheat Vegan (or not) Pancakes

Ingredients
1 cup whole wheat flour
1 tablespoon brown sugar
1 teaspoon baking powder
1/4 teaspoon salt
dash of cinnamon
1 cup soy milk (more if needed)
1/2 banana (very ripe and mashed)
1 teaspoon vanilla
Blueberries (optional)

Mix flour, sugar, baking powder, salt and cinnamon. In another bowl, combine all other ingredients. Add wet ingredients to dry ingredients and stir well. Add more soy milk by the splash if batter is too thick.

Scoop batter with a ladle and add spoonfuls to a skillet on medium-high heat. If you're adding blueberries, place them in the pancakes individually. When pancakes begin to bubble, flip with a spatula. Cook until browned on both sides.

Makes about six pancakes - which you can share, or eat alone.

Serve with maple syrup, butter (if you're not a vegan) and jam.